Tag Archives: Tutorials

Easter Bunny Bowling

29 Mar

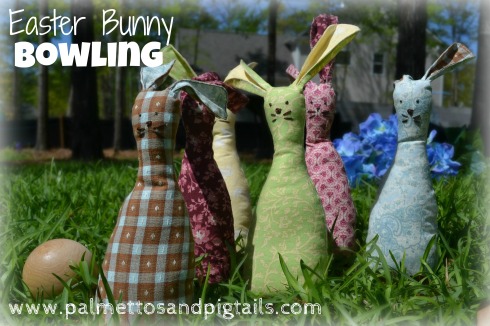
Well, aren’t I the crafty one lately!!  I told you I have been working on lots of things….  I think it must be my daily schedule.  I seem to be more on track lately and better able to manage my time (which gives me more ME TIME!). You know that we have put ourselves on a budget, but did you know we are also on a diet?  I’ll have to post more about that another time (just know we have lost almost 10 pounds each within the last month!!).  Because of these two factors, I have been searching for some creative, cheap Easter basket stuffers.  I didn’t want to fill the girls’ baskets with tons of candy and junk, and didn’t want to spend a ton on little Easter-themed junk either.  So what did I do?  I turned to Pinterest, of course!

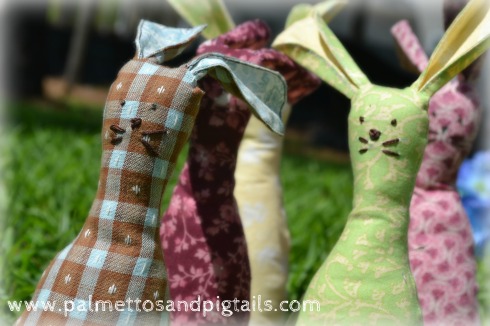
I found a free pattern for these cute little guys on etsy….free! courtesy of The Long Thread .  Hers were solid colors with patterned ear-insides.  But I had some beautiful spring scraps that I decided to use instead.

And I had the hardest time finding a hard wooden ball to serve as the bowling ball.  I finally found one at A.C. Moore….but it’s actually a doll head, and a little flat on one side.  So I plan on sanding it down a little more so it rolls better, and then painting it brown and modge podging something cute on….TBD.  I just have to find a naptime when both girls are down to break out the paint and glue!

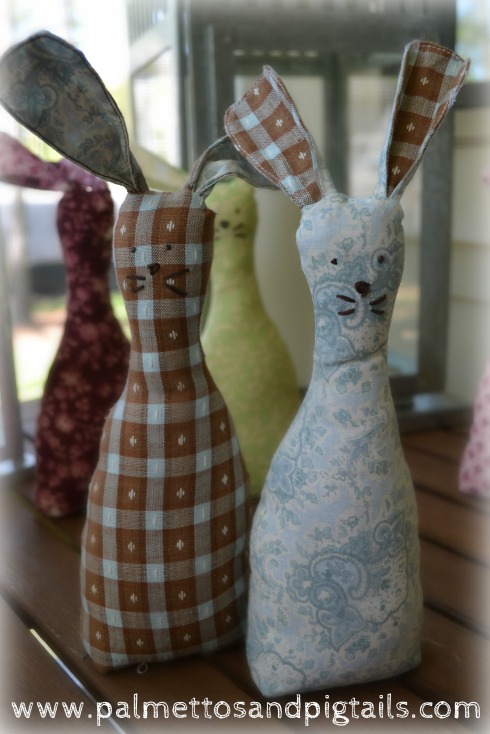
I chose six fabrics, but made sure that they were grouped in pairs that matched, because I wanted the ears to coordinate with the bodies.

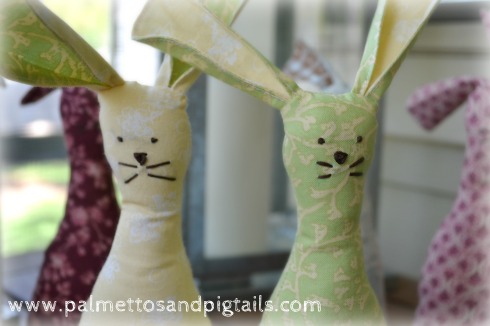
If you try this project, here are a couple of hints: Although I loved the darker, busier patterns (my reds!)….it’s much harder to see the embroidered faces because of this.  However, the lighter fabrics made the dark embroidery floss show through….so make sure to trim if you use lighter fabric.  I had planned to add a little something for a tail, but I forgot…so let me know if you try this and add one-I’d love to see your ideas!  Also, I did use a 1/2 cup of rice like the directions stated, but I filled the bunnies up with a little more stuffing than she prescribed….to about an inch from the bottom.  And finally, I don’t really like my ears.  I was worried about them being too short, so I was stingy on the seams….when actually the opposite happened and I think they are a little long (they have a hard time standing up!).  So feel free to extend their seam allowance a little (maybe to 1/2″)…and maybe your bunnies’ ears will be perkier!

Here’s the direct link to the pattern

I’m linkin’ up this week…and I have some new linky parties so be sure to check them out for other Spring inspiration!

Scrap Quilt

25 Jan

I’ve been sewing for about a year now, and have no real craft area.  Everything is kept in Tupperware tubs in a giant armoire.  So, needless to say, I was overflowing with little scraps of fabric.  Time to do something with those little pieces.  Because they were kind of all in one color family (pinks, browns, turquoise and green), but all different sizes, I decided to try my hand at a scrap quilt.

Don’t get me wrong….I can appreciate the design and hard work that quilters put into their creations.  But I have no desire to become a quilter.  In fact, I can barely call myself a sewer……so I needed to be able to do this simply and quickly.

So I cut up my fabric into different size pieces, using several pieces of cardboard as my templates to trace.  I had a quilt panel in my pile of random fabrics, but like I said….I have no intention of quilting.  So I cut it up instead, cutting the characters from the quilt panel into the largest squares, and then using the surrounding patterns as smaller parts.  I used strips of the fabrics as the borders too.  And to be honest, I did this completely by trial and error….I had no idea what I was doing.  But, I figured it was a scrap quilt, so the more hodgepodged it looked, the better.

Bear with me…..here’s how I did it:

Materials:
thirty 6 1/2 inch squares
sixty 3 1/2 inch squares
seven strips of 45 1/2 inches worth of fabric…..with each strip being 2 inches wide….and having 1/4 inch of seam allowance on each end
one large piece of fabric 47 inches by 45 1/2 inches
1 piece of quilt batting measuring 46 1/2 inches by 45 inches

I had a big scrap of padding….so I folded a corner over to form a square and cut off the excess ( I think it ended up being about 46 square inches)
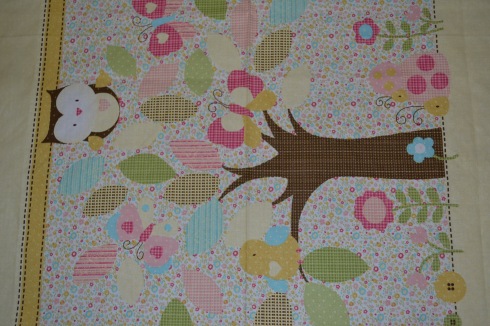
This was one of the spare pieces of fabric I had that I loved, but wasn’t sure what to do with….so I cut it up to use as my focus squares on my quilt.

I measured all of the little critters on the panel, and luckily they all were about 6″….so I decided to make my larger squares that size (when finished).

I used a piece of cardboard as my template to cut around.  (I made three templates…a 6 1/2″ square, a 3 1/2″ square and a 2″ wide strip….length doesn’t really matter…..all seam allowances for this project are 1/4″)

 There were large chunks of interesting patterns left after I cut out the critters, so I supplemented more 6 1/2″ squares with them (and other fabric I had), and also used them for my smaller squares (which ended up being 3 1/2″ squares).  If you look carefully, you can see where I drew my lines using a washable fabric pen.  All of my seam allowances were 1/4″.

I also cut 2″ strips from scraps (varying lengths) to use as my borders.  Then I laid everything out on top of my batting.  I wasn’t too concerned about it fitting exactly, but I wanted to make sure that it was at least as wide as the batting….I ended up trimming excess at the end of my project.  I also cut out one large piece of fabric to be the back of the quilt…..measure it to be the same size as your batting, and then add a 1/2″ around the edges to account for the seam.
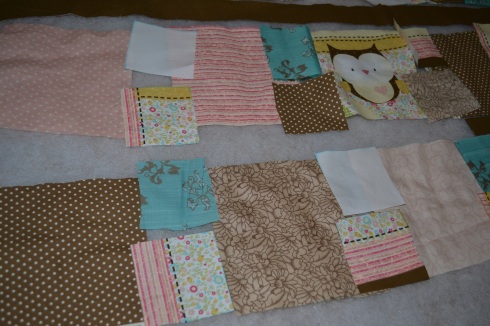
Lay out your whole quilt…..I alternated one 6 1/2″ square and then two 3 1/2″ squares across, and then a 2″ strip in between each of the square rows.  Just keep cutting scraps until your quilt is filled!  I arranged mine on top of my batting to make sure it was big enough, and so I could get a visual on where all of the pieces were going to go.

 I wanted to make sure that each of my fabrics were spaced out, and no two same patterns were touching.  I also had to watch the spacing of my green and turquoise pieces because they totally clashed together….but spread out against the other patterns looked nice and were great bursts of color!

Time to sew!
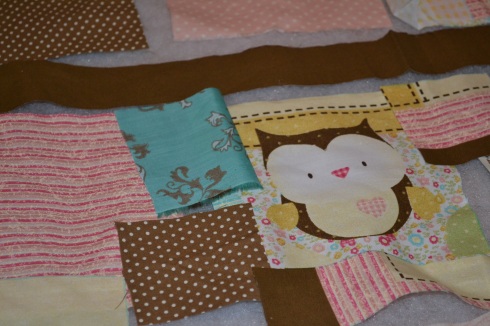
Since there were going to be two 3 1/2″ pieces in between every 6 1/2″ piece….I needed to sew those together first.

I started to pin everything together before sewing….and quickly gave up.  So much easier just to hold it in place as I sewed!

Take your two 3 1/2″ pieces and place them right sides touching, raw sides together.  Make sure you know which edge to sew (based on the two 6 1/2″ squares it will be touching….pay attention to color and pattern placement).
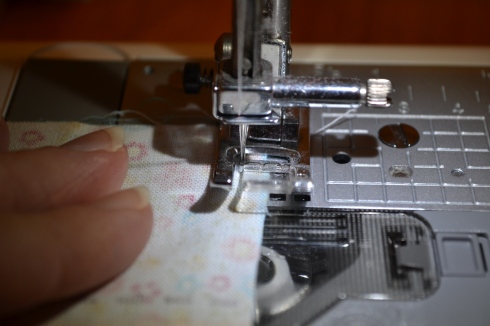
Sew the two pieces together with a 1/4″ seam…do a quick backstitch at the beginning and end to tack the ends.
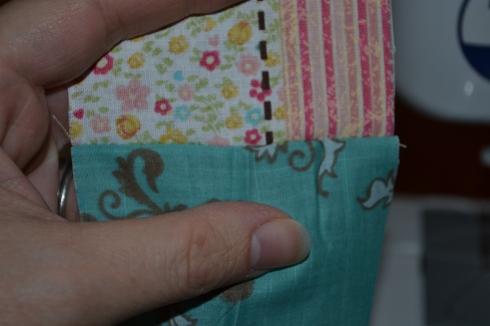
Here’s what the seam should look like on the right side.  Sew all of your pairs of 3 1/2″ squares together…but keep them placed out on your quilt so you know which direction they should go (again, watch your colors and patterns!).

Line up the raw edges of the 6 1/2″ square and the two (sewn together) 3 1/2″ squares….right sides touching.
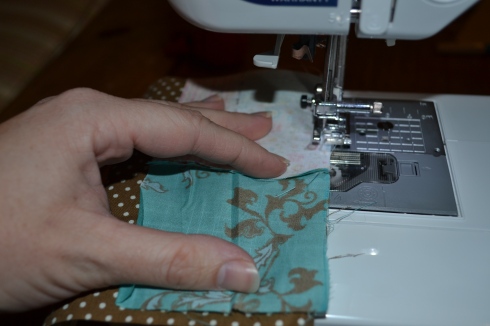
Sew 1/4″ seams, and backstitch.
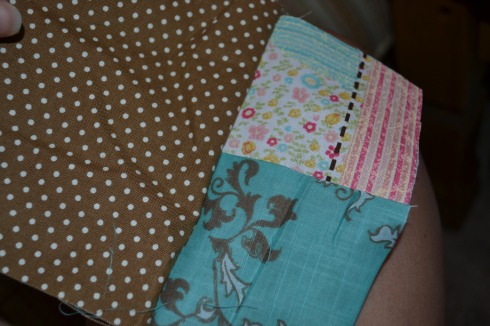
Here’s what it should look like.

Sew on the next pair of 3 1/2″ squares to the other side of your 6 1/2″ square and continue to the end of the row.

Here’s the first row I completed….you can see I didn’t follow my own advice about really watching my placement and which sides I was supposed to be stitching together….my snail was sideways!  I had to undo the stitching on both sides of that square, turn it, and redo it!

Do the same with your 2″ border strips.  Sew them all together-end to end with 1/4″ seams.  Then place them right sides together with your square strips, raw edges touching.  Sew a straight line down the whole strip (1/4″ seam), and backstitch at beginning and end. Once you do this to all of your strips, your quilt will be all in one piece….very satisfying to see it all come together!
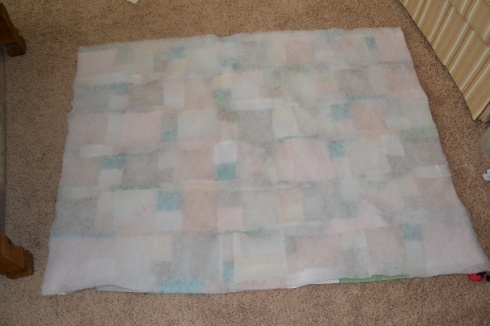
I pinned the right sides of my quilt and the fabric for the back together.  I layered the batting on top of the quilt back and pinned it.

Ok, so I forgot to take pictures of these next couple of steps (sorry!), but they were pretty easy:

-I sewed all the way around (1/4″ seam), making sure to get the batting into the seam as well.  I left a 6-8 inch opening on one end so I could turn everything right-side out.

-Carefully stuff everything through the hole so that your quilt is facing right-side out.  At the hole, fold the raw edges under (and pin if necessary) and sew closed.  I use an 1/8″ seam allowance to sew it closed…..and then I keep going all the way around the edge of the finished quilt.  Then, I sew another stitch at a 1/4″ in from the edge….all the way around to give it a nice finished look.

Then I sewed along the right hand side of each of the strips of fabric in order to keep the batting in place.  I spread out the seam and used a light pink thread since it matched much of my fabric color and was light enough to be seen on the back of the quilt (my fabric was a yellow and white gingham on the back)

Done!
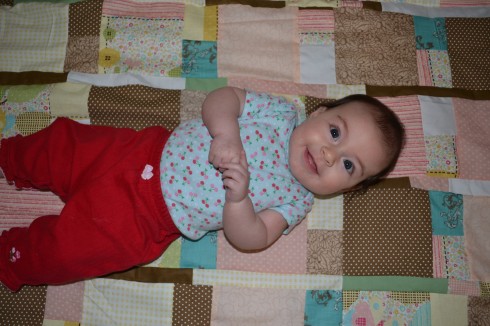
And she loves it!

Room for two!

P.S. Here’s where I’m linking up!

Paper Mache NOEL

29 Dec

So you may have noticed the NOEL on my mantel.  I was feeling like my mantle needed a little something, and then I saw this on Pinterest.  Perfect!

Too bad I had  no time to actually follow those oh-so crafty directions.  But….I do have a crafty sister.  And I do have newspaper.  And flour.  Hmmm….paper mache anyone?  Here’s what Loo did:

First (I forgot to take a picture, sorry!) she mixed together approximately 1 cup of flour and 2 cups of water.  Tear your newspaper into one inch strips, about three inches long.

Dip each strip into the flour mixture and slide it over the side of the bowl to get off any excess liquid.  Wrap it tightly around each letter, overlapping each strip of paper a little bit.

Feel free to kind of paint the flour mixture over the finished letters, especially around the corners.

Someday, when we have some more time and inspiration (and hopefully before next Christmas!), we’ll end up putting some sort of color or texture on them.

Stay tuned for an updated picture once we finish it!

Christmas Yarn Ball Wreath

22 Dec

It’s been a hand-made Christmas this year for me….well, decoration-wise anyway.  With a new house comes a craving for new decor.  So, inspired by Pinterest and my fellow bloggers (and a little bit of Martha Stewart!), I set out to create.  One project was a new wreath for our porch door.  I made a burlap fall wreath, but obviously it was time to replace that.  I found this cute little number on Pinterest, and decided to try to replicate it.

Here’s how I did it:

I bought red and white yarn, and a spool of jute (twine), and a wreath form.  You’ll also need thick ribbon, scissors and hot glue.  I cut each page of the newspaper into quarters, and then crumpled them into balls.

I decided that the base of my wreath was going to be red, so I tied a knot around the wreath form at the seam and slowly wound the yarn around it, being careful not to overlap and to keep the yarn tight.

When I reached the end, I just tucked the yarn under….not very sturdy, but I’d be glueing on my ribbon holder on top, so it’s ok.

I secured one end of my ribbon where I had tucked the end of the yarn, using hot glue.  Do not secure the other end of the ribbon yet.

Then, with a second piece of ribbon, I formed a loop and hot glued it on top of the yarn and the already glued down part of the ribbon.

Then I took the first ribbon and wrapped it over the second loop and secured with hot glue.

Moving on to the yarn balls.  Just wrap them tightly around the newspaper balls.  You want the newspaper to be completely covered, and its ok that the balls are slightly different sizes.  I made about 22 of the red and white, and 8 of the twine.  Even though technically I am finished with my wreath, I still may go back and add some more balls to the sides and top to give it some more depth and bulk.  You can always add more, so I’d start with just 20 or so.  Find something good on TV because these take awhile!

Jayna decided she wanted to help wrap some balls too…..I’m thinking her fine motor skills aren’t quite there yet, what do you think?

But she was ok, she settled for naming her new baby “Yarnie” and toting it aroudn with Pink Baby.

Ready to glue on!

Start slowly, and layer as you go.  Remember that there is newspaper in the middle, so the balls can kind of be squished to fit where you need them.

Tada!  Great, bright addition to our living room!  And because I only used red, white and natural colors…I feel like I can leave it up through the winter…not so Christmas-y!

See on the left hand side where you can still see some of the red yarned wreath form?  That’s where I will probably end up adding a few more….you know, in my spare time!

I’m linking up here this week!

Pumpkins into Winter Decor!

9 Dec

We went a little overboard on the pumpkins and gourds this fall.  But I just couldn’t help myself!  All of the different colors and textures just really get me into the Fall spirit!  But, now Fall is over.  We ended up only carving two of the pumpkins, and now we have several that are still perfectly good….but just don’t fit in with our Winter decor…..Hmmmm….what to do?

Spray paint!

I bought red, green, white and gold spray paint at Lowes and went to town in the backyard!

After spraying a base coat onto all of the pumpkins, I used round stickers and painters tape to mark off sections of the pumpkin, and then sprayed a darker color over it.  It resulted in some polka-dot and “gift-wrapped” pumpkins!

Now I just need to find a giant gold bow to put on top!  I ended up putting the pumpkins back out on our front porch stairs, where there were for the Fall too.  A couple of the smaller ones now call the mantle home.

Remember my pumpkin entrance?

I loved it. Wished I could keep it all year.  But alas, this didn’t go with our Winter decor either.  But I didn’t want to just toss the perfectly good pumpkins.  Cue the spray paint!

I also sprayed the spanish moss white (it ended up still being a gray-ish color, but that was ok).  So I stacked ’em back up on my porch. Added a scarf.  Glued on some small black buttons for eyes and some large black buttons for…well, the buttons.  And cut a triangle nose out of orange sticky-backed foam. (Yes, I did try to hot glue an actual carrot onto his face, but the glue wouldn’t stick.)

Here’s how I made the hat.  My top pumpkin (which would be the head) had a long stem, so I wanted a hollow hat that I could fit right over the stem.  I used an old soup container and some more sticky-backed foam.

I wrapped the big piece of foam around the outside of the soup container and trimmed it to fit.  Then, I cut a circle to fit the top.

Since all I had left was two smaller pieces of foam, I cut two semi-circles slightly larger than the circumference of the soup container to be the brim.  If you had a big enough piece of foam, you could definitely just make it a circle.

Then, because my top pumpkin had a stem that I wanted the hat to balance on, I cut the middle out and then glued the two semi-circles together to form one circle with a hole in the middle.

Finally, I positioned the soup container over the hole so the brim was centered and hot glued the container to the foam.

Then I carefully positioned my hat on my pumpkin and viola!  Repurposed pumpkins into a snowman! I also have sticks for arms…but for now, can’t figure out how to attach them without puncturing my pumpkins….plus I think he looks just dandy without them!

Turkey Tee-Shirt Tutorial

24 Nov

Thanks to The Cottage Home’s Tutorial, I made a little Turkey-Tee for both of my little turkeys!  Thanksgiving is obviously always a big deal, but this year, it’s extra-special because it falls on the Thursday after Amelia’s baptism, so we have LOTS of family and friends staying in town for the holiday weekend.  Also, with it being our first of many Thanksgivings in our new house, I’ve been thinking of traditions to start…got any ideas?  What does your family do on Thanksgiving Day?  In our house, the men always fry a turkey (or, two, this year!) and watch football, while the ladies cook up some yummy side dishes and catch-up.  And the Macy’s Day parade is almost always on in the background!

Back to the tutorial…..unfortunately, I wasn’t able to open Cottage Mama’s template, so I did mine from scratch, based on hers.  So bear with me!  Included on my template is also the leaf templates from this tutorial.

For the tee-shirts, you will need:

6 different patterns of scrap fabric…ideally in the same color scheme
1 shirt in the size of your little turkey (I actually went a size up so Buggy can wear hers next year too!)
Iron-On Adhesive (that’s the kind that sticks on both sides!)
Sewing Machine
Iron
A couple of hours while your kids nap


Directions:

1.  Iron on the adhesive to the fabric squares, leaving the paper backing on.

2.  Print out the turkey template, cut out the pieces and trace them onto the paper side of the adhesive.  You will need two feathers from each pattern (except for the middle feather…you just need one of those).

3. Cut out all of your pieces, which will have fabric on one side, and the adhesive backing on the other (with the paper still on).

4. Iron on each feather, starting with the middle one.


5. Carefully stitch around each feather and the body, leaving a little edge for natural fraying whenever you wash your shirt.

6. Using embroidery floss, sew a “V” on your bird’s face, for a beak,  and one long stitch and three short stitches for the feet.  Make sure all of knots are on the inside of the shirt.

These are my knots on the inside of the shirt for his legs.

7. Cut about a half an inch of red rick-rack for the turkey’s gobbler/hully gully/whatever you want to call it.  I singed the ends off with a lighter to prevent fraying.  Then I used red thread and my sewing machine to carefully sew it down.

8. Finally, I turned them inside out and ran them through the washing machine.  Then I attempted to get all three girls to pose in them….but have you ever tried to get three toddlers awake, in a good mood, and dressed….all at the same time?  Impossible.  So, next best thing….

Happy Thanksgiving!

Here’s where I am linking up this week!

Albuquerque was a Turkey

17 Nov

I’m not sure what the rest of the words to this song are….all I know is that Jayna is singing it in her Thanksgiving Program at school next week, it is sung to the tune of “Clementine,” and Jayna only knows one line of the song.  And that one line is subsequently in my head ALL of the time!

So, in honor of Mr. Albuquerque the Turkey, I made some cake pops in the shape of turkeys for our Sunday School Thanksgiving Dinner….also known as our Meat and Skeet.  We all bring our favorite Thanksgiving Day sides and desserts and gather at our friends Lisa and Jordan’s house to fry up some turkeys, shoot some skeet and visit.  It’s always a good time, and a great way to kick off the holiday season.

While we were there, Jayna used the rest room and then promptly told me that “Ms. Lisa’s toilet paper is sooooooo soft!”  When she told Ms. Lisa how much she loved her toilet paper, Ms. Lisa let her take home a roll!

And now for my turkeys.  At first, I was skeptical, but after they were finished, I decided they really were quite cute!

I started to draw eyes and little pointy beaks on them….but then decided that the beaks looked like smiley faces and they looked kind of dumb.  So half of them had faces and half did not.  They all got gobblers though! (Made out of little colored chocolate pieces I found at Party City).

The heads were made from the all chocolate M&M’s….they are slightly bigger than regular M&M’s and the whole pack is brown!  No more digging through the colored bags!  The heads were held on with a dab of melted chocolate.

Tail feathers were made from “Indian Candy Corn” and held on by a dab of melted chocolate.  Feet were the ends of pretzel sticks stuck into the melted chocolate as soon as I dipped the balls in chocolate.

They were a little more involved to make, but a terrific hit at the party….they were gone so fast that I didn’t even have a chance to photograph them on the table!!

Here’s where I’m linking up this week!

DIY Artwork Display

1 Nov

Buggy has been quite the budding artist lately.  She especially has been into painting handprints, creating rainbows, and drawing pumpkin patches.

I love her creations. I love that she loves to draw.  I do not love a ton of paper lying around.  So what’s a mama to do?  Utilize some wall space, of course!  I decided to make a homemade clothesline, but for artwork, in the playroom.  So I went to Michaels and bought some wood blocks and painted them brown.

Then, I attached some picture hangers to the back (they just hammer in).

While I was at Michaels, I also picked up some of these pre-painted cuties.  I used a hot glue gun to attach some jute rope to the back of them, and then glued the whole thing to the front of the wooden blocks.

Then, Linds and I stretched out the rope (almost taught) and centered it on the playroom wall.  Dave hammered in some nails, and we hung the wood blocks on them.  We hung them higher up (by the top of the door frame), so that I will have enough space to add another clothesline underneath if I need to.

I hot glued some ribbon onto clothespins and hung up some of my favorite Jayna-creations for all to see!

Tada!

Monster Cake Pop Tutorial

27 Oct

Hello, my faithful followers!  Sorry it’s been awhile.  We have been cRaZy busy these past few weeks, unpacking the last of the boxes and getting ready for the Halloween season!  Our annual party is this coming Saturday, so we are working into the wee hours each night getting the house, food and costumes ready.  Don’t worry, you’ll get to see pictures!

In my spare time, I’ve learned how to make cake pops.  And, if I do say so myself, I’m quite pleased with my first attempt!  I decided to make some practice pops before attempting the real deal (Mummies and Jack-o-Lanterns) for the party.  So I made some little green monsters for Jayna’s class party.  Here’s a quick tutorial how to make them!

These monster pop ideas and how I learned to make them came from this awesome book (that I found at  Lowes, of all places!!).  The recipe is adapted from the book.

Ingredients:

1 box of cake mix
1 can of frosting
1 bag of candy melts (in whatever color you want your monster to be…I used green)
1 tube of white decorative icing
1 tube of black decorative icing
1 tube of decorative icing in the same color as your monster
1 tube of decorative icing in whatever color you want your eyes to be (I used orange)
1 bag of paper lollipop sticks
1 block of styrofoam
1 microwave safe bowl
*I got my materials from Publix (icing) and Michaels (everything else)
 

Recipe

1. Bake the cake according the box’s directions.  Let it cool completely before doing any of the next steps.

2. Carefully slice off any brown crust off of the cake and place on a plate to munch on.

3. Place the rest of the cake (the yellow part if you used yellow cake mix) in a bowl and crumble it into fine crumbs.

4.  Mix about 1/2 to 3/4 of the jar of icing into the cake crumbs.  And using the back of a metal spoon, mush it together until its about the consistency of raw cookie dough.

5. Using a melon baller (to make all of your pops an even size), scoop out little balls and then roll them with your hands to make them completely round.  I placed mine on a parchment papered plate that I knew was small enough to fit in my freezer.

6. Let your 2 year-old sous chef lick the spoon (after you taste test it as well!)…remember everything is already cooked, so it is perfectly safe!

7. Place your cake balls in the refrigerator for a couple of hours.  Or, if you are a normal person and don’t have room in your refrigerator, or a couple of hours to wait for these little things, stick ’em in the freezer for about 15 minutes.  They will not freeze completely.  If you don’t have time to finish the recipe, you can also stick them in a ziplock bag and freeze them for later.  Or, until your hubby finds them…then there might only be 4 left.

8. When you are ready to decorate, let the balls sit out on the counter for a couple of minutes to warm up a bit.  I found out the hard way that the balls expand a little as they warm up, so if you dip them in chocolate too soon, they will crack!  No worries for this particular recipe though, as you can just cover the cracks with icing.

9. Dump your chocolate melts into your microwave-safe bowl and microwave them in 30 second intervals until the chocolate is completely melted and drips off ouf your spoon.  This usually takes me three 30-second intervals.  Don’t over heat it…your chocolate will clump!  If you need it thinner, add a little vegetable oil (just a splash) to the chocolate and stir it for a good minute or so.

10. Dip the end of your lollipop sticks into the chocolate and then stick it in the middle of each cake ball.  This will help keep the ball on your stick.  Put the stick with the ball on the end into your styrofoam and pop it into the fridge for about 5 minutes to let it harden.

11. Dip your cake balls into the chocolate one by one until they are completely covered in chocolate, then stick them back into the styrofoam and back into the fridge.  I let them stay in there for a good 20 minutes or so to get the coating nice and hard.

12.  Notice the crack on the right cake pop above.  No worries.  Take your tube of icing that is the same color as your cake pop.  Draw squiggles all around the ball and then kind of dab and them to make them look really messy.  Make sure you cover up any cracks.

13. Stick them back in the foam and back in the fridge for about 5 minutes to let them harden a little bit.  Then, using your tube of white icing, draw a large circle and color it in white.  Or, draw two little dots.  Back in the fridge for 5 minutes.

14.  Draw a slightly smaller circle on top of the white circle with your eye-color tube of icing.  Then use the black to make a small dot (the pupil) in the center of the color.  Or, if you have two white dots, just use the black icing to put pupils in the middle of the white.

Is it just me, or do these look like Oscar the Grouch a little?!?

Tada!  You are done!  I put mine back in the fridge overnight to get the icing nice and hard, because the next morning I stuck them in little baggies to take to Jayna’s school to hand out at her party.  Mmmmm….heaven in a bite!

I linked up!
NightOwlCrafting

Photobucket

How to Coupon, Part 2: Keywords, Abbreviations and Organization

26 Aug

Like I said in my previous post, there are LOTS of keywords and abbreviations in couponing.  It’s hard to keep them straight….but once you learn the terms, it’s quite easy.  Here are a few that you’ll need to know:

  • SS 4/17– Smart Source from April 17th….an insert in your Sunday Paper
  • RP 4/17-Red Plum from April 17th…an insert in your Sunday Paper
  • PG 4/17– Proctor and Gamble from April 17th…an insert in your Sunday Paper (does not come every week like SS and RP though)
  • Catalina-these are usually manufacturer coupons, and they print out with your reciept at the register
  • Blinkie-a manufacturer coupon you pull from the little machines that are on your grocery aisles (usually in frozen foods, but can be anywhere)
  • Store Coupon-this is a coupon that states a specific store somewhere on the coupon
  • Competitor Coupon-this is a competitor’s store coupon that is accepted at your local store (i.e. Publix accepts Food Lion coupons)
  • Manufacturer’s Coupon-this is a coupon usually found in the newspaper, magazines, or online that is made by the product’s manufacturer….stores get PAID to take these coupons!
  • Tearpad-could be a store or manufacturer’s coupon, or a sweepstakes/rebate of some sort….usually located near the item on the shelf or at a turnstile by the front door of the store
  • Home Mailer-coupon booklets that get mailed to your home….should be store or manufacturer coupons….you usually have to sign up online to get them
  • Printable– usually located on Southern Savers in BLUE because it is a link to a printable coupon….usually manufacturer’s but sometimes a store coupon…you may have to sign up on a website in order to print these coupons out, so beware of the information you put out on the web!

So now you know (if you read Part One) how to use the Southern Savers website, and find the coupons you need for each item.  On that post, I mentioned the checkboxes listed next to each item.  These allow you to create a grocery list straight from the website, that can include the coupons you need as well!

Here is how I create my grocery list for the week:

  • I scroll through the sale items, checking the boxes for the items I need.  I also look for items that happen to be good deals (usually under a dollar)…even if I don’t NEED that item this week.  This is called stockpiling.  Most grocery store sales run in cycles…so a particular item may go on sale every six weeks.  So the best way to save money is to stockpile the item for 6 weeks (i.e. buy enough of that item to last you 6 weeks, or however long the cycle may be).  BUT in order to do this, you will need multiples of coupons.  You can subscribe to multiple papers to do this, or you can buy bundles of a certain coupon online for a minimal price.  This is not something I do.  I don’t stockpile for 6 weeks, but I do pay attention to good deals and buy them when they are on sale, even if I don’t need them.  My examples are mostly toiletries….I buy deodorant and toothpaste (various brands) pretty much every week, because different brands are on sale each week (I never pay more than .25 for toothpaste and never more than $1 for deodorant).  Needless to say, we don’t go through a tube of toothpaste in a week, but I have plenty in my linen closet!  I also donate these items if I get too big a stockpile!

But I digress….back to my personal shopping process:

  • So I check the boxes of things I need and don’t need (but are a good deal).  Then, at the bottom of the Southern Savers page, there is a box that looks like this:

  • Don’t click on the “Select All Items?” button, because you have been clicking on the stuff you want as you went through the ad, right?  Notice that “Include all Coupon Match-Ups?” is automatically checked for you….leave it that way.  This will allow you to see the coupons you need right on your shopping list. 
  • Then, click on the “Creat List” button, and a separate window or tab should pop up with your shopping list….all of the items that you clicked on in the ad, as well as every coupon for each item.  It’s a lot of info for a shopping list.  DON’T PANIC! We’ll shrink it down!  Here’s what a small grocery list may look like (for example purposes):

  • Next, I go through each of my items on this list, and get rid of any coupon match-ups that I don’t have.  For example, I don’t receive any of the All You magazines, so I won’t have any of those coupons.  And remember when I said that your newspaper inserts may be different from Jenny’s, since they are regional?  Well, I lose out on a lot of coupons because of that too.  So go through your list and get rid of the coupons you DON’t have.  As you roll over the coupon name with your mouse, it will turn light red and cross out the words.  If you single click when this happens, it takes that coupon off.  Everything on your list shifts up, and viola! your list gets smaller and less intimidating!

Notice that I am deleting the coupons that I don’t have (because they come in magazine I don’t get, or home mailers I don’t get), as well as coupons that have expiration dates that have already passed.  These deletions are pretty easy to do right away, without any digging around.

  • Next comes the more involved process of narrowing down coupons.  Look at each of your items and determine which coupon listed is the best deal.  For example, since Publix will double any manufacturer coupons up to .50, a .50 off coupon is worth more than a .75 off coupon.  Following me?  So I look at all the coupons, and find the best ones and then find those coupons in the newspaper inserts (or online by clicking Printable). I try  to get one Publix coupon, one competitor coupon and one manufacturer coupon for each item in order to get the best deal (called stacking!).

SIDEBAR!!!  Here’s why it’s important to save (and label) ALL of your newspaper inserts (Red Plum, Smart Source and Proctor and Gamble).  The coupons listed in there quite often do not expire for months!  And Jenny from Southern Savers finds coupons from those back-issues of the inserts.  So save them all.  I use a big accordion folder with oh, 13-16 pockets.  I write the date of the insert really big on the front of each insert, and then file all the inserts by week in the folder (oldest in front to newest in the back).  It seems that by the time I fill up the whole accordion, the inserts in the very front have expired coupons in them and its time to throw them out.  So about once a month I throw out the oldest four or five weeks of inserts and shift everything forward, making room fort he next months.

Oh! I also leave the very back pocket for all of my home mailers, Yellow and Green Advantage fliers, etc.

On occasion, you will have loose coupons as well.  These may be blinkies or Catalinas or may just be the random coupon that hasn’t expired from one of your inserts from six months ago (so before you toss them out, it doesn’t hurt to flip through!).  I also print out coupons that are high value, and save them for when those items go on sale.  So, where should you keep all these loose coupons?

In one of these suckers! Envelope sized accordion folders!  With tabs.  I have my tabs organized by Publix food aisles, so I can find a coupon fast if I remember that I need something while I’m at the store.  I’ve seen the ladies with huge Tupperware containers that they carry around, or big binders of loose coupons.  That may work for you, but to me this is much easier.  I usually only have a few coupons in each section, so it’s not overwhelming to see if I have a coupon for an item or not.  And I only clip coupons for items I need in one particular week, so I almost never have leftover coupons.  Which is also how I really only spend an hour a week doing this!

The two clear pockets in the front are labeled New Coupons (usually blinkies that I pick up while I’m shopping) and Reward Bucks (these are same as cash and print out at CVS…I hardly ever shop there, but I am ready for free money when I do!).  The reason I keep the new coupons separate for a little bit is because I am a little OCD.  Here’s why.  I actually created a spreadsheet in excel for all my loose coupons.  DO NOT feel like you have to do this.  I recognize that I have a problem! =) I like to know what coupons I have in my little folder at all times, so when I get home from the store (or more likely, the next week when I am couponing), I add my newest loose coupons to my database. 

Here’s what my spreadsheet looks like (hopefully it’s big enough to see):

I have all of my abbreviations at the top.  The first column lists each Publix grocery aisle in the order of my particular store (which corresponds to the order of the tabs in my coupon folder).  Under each bolded aisle, I list individual loose coupons.  I list them on my spreadsheet in alphabetical order so they are easy to look up, if I am looking for a particular coupon.  However, in my folder, I have them filed by expiration date, so it’s easy to clean out when they expire.

The second column is labeled “Deal”, and I specifically list what the coupon is for….very helpful to notice that a coupon may be $1 off 2 items (aka $1/2) versus .50 off one item (hint: the .50 one is more valuable in general because you only have to buy one item, and the Publix doubles it to a $1 off of one!). 

The third column is labeled “Store” and using abbreviations, I list if it is a Manufacturer Coupon (M), Publix Store Coupon (P), a Food Lion Competitor Coupon (FL), etc.  Ideally, I can find one M, one P and one FL coupon for each item (called stacking!)

The fourth column, labeled “Expiration” is when the coupon expires (I have a filter on this column, so I can sort by date and delete groups of coupons when they expire).  And the last column is “Source and Date”…which tells me where I got that loose coupon from (a Blinkie, a Catalina, off of a food package, a home mailer, internet, etc.).

If you want to use my spreadsheet, or just look at the full document, click here.  Hopefully  you will be able to change it to suit your needs.  Please leave me feedback!

Notice there are a couple of items highlighted on it, they are coupons that I have pulled to use during a shopping trip.  I highlight (rather than delete) so I can keep track of what I use from my folder, but sometimes it doesn’t work out and I don’t end up using the coupon I highlighted. If I do use it, I can just delete it from my spreadsheet….if I don’t use it, then I re-file that coupon and un-highlight the item on my spreadsheet.

Sorry, I got waaay off track that time!

  • So after you have deleted the coupon matchups that you don’t have (from magazines or home mailers), and found/clipped your best coupons from inserts or online, delete all the rest of the coupons you aren’t using.  So you should only have the actual coupons you possess listed under each item you want to buy.  Which will significantly reduce the length of your grocery list.
  • Organize your coupons with Store Coupons first, Competitor Coupons second, and Manufacturer Coupons last.  This will help your cashier.  Also watch as they scan, making sure all the coupons are counted.  When you are shopping, take care to buy the exact items that your coupons are for, to avoid complications at the register.  I also give my stack of coupons to the cashier before he scans anything, because sometimes they have to note a price as they scan…knowing the coupons ahead of time prevents them from having to dig in your bags looking for specific items.

Hopefully, all these hints will help you save some money! I have only been couponing since January of 2010, and last year we spent about $5,000 in groceries for the year, and I saved $3,000 because of coupons and sales.  Not too bad for my first year!  Good luck, and feel free to leave me a comment if you have a hint or a question!