Tag Archives: Decorating

I was Featured! (and A Spring Wreath Tutorial)

5 Apr

Happy Tuesday!  I’m so excited to tell you that I was featured on My Favorite Finds this week (for sharing last week’s tutorial on my Upcycled Brown Paper Basket).  It was super easy to make….you should try it!

PhotobucketHere’s something else that is easy to make…

I was challenged about a month ago, by my mother, to make a spring wreath. And because I have nothing better to do, it kind of got pushed to the bottom of my To-Do list.  But then, I remembered that I would much rather craft, than wash windows.  So, it got pushed back up to the top!

I saw lots of cute spring wreaths on pinterest, and decided to keep it simple, with materials I already had.  After all, I didn’t want to blow my new budget already!!!

So, I decided to use some foam (from Lowes) duct-taped together to make my wreath form, and some left over packing paper from our move.  My goal was to use the paper to create some shabby-chic-ish southern inspired (Magnolias, perhaps?) flowers.

I crinkled up the paper and wrapped it around the wreath form to completely cover the grey color.

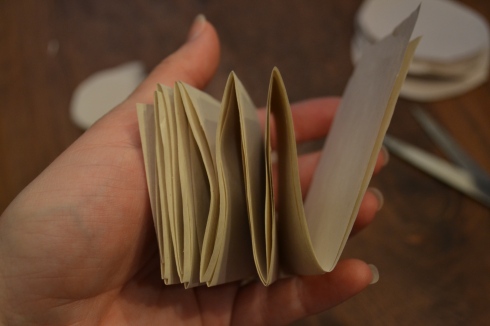
And then I cut the paper into strips.  I folded the strips accordion style width-wise, so I could cut more circles out at a time.  I cut three sizes of circles.

My circles were a little sloppy and uneven, but it didn’t matter at all in the end. And as I worked, I decided that my mom’s wreath needed a little color.  But I still liked the idea of a white base to the wreath.  So I decided to color just the edges of each of the circles purple (perfect for the Lenten Season!).

After coloring ALL of those circles, I started crinkling.  I actually got Jayna’s help…she crinkled and reopened my flowers, and then I glued the three layers together.  Then I topped it with a little crinkled scrap of paper in the middle to be the flower’s stigma.

I used a hot glue gun to glue each flower onto the wreath form, in close proximity to each other, so they kind of all scrunch together.

And I left a little gap at the top, so that when my mom hangs it, her wreath hanger won’t squish the flowers.  I put a little smiley on the back so it would be easy to find.

But then I decided that I needed a bow to make it look a little more complete (and elegant!).  I had a hard time finding ribbon that I liked, so I bought some thick, crocheted lace instead.  I made a bow and tacked it in place with hot glue.  Perfect….shabby chic!

Here’s where I’m linking up this week!

A Little Bit of Love

14 Feb

Usually, Valentine’s Day isn’t so big of a deal in our house.  I’d like to think that we are pretty good at showing our love on a daily basis….so usually Dave and I just go out to dinner…maybe a glass of wine.  This year, though, thanks to Pinterest and a big sale at Michael’s, I had lots of inspiration!!

 Found this idea here…took a toilet paper roll and used it to stamp hearts on butcher paper to serve as wrapping paper.

Found this idea on pinterest, and did it myself….but her idea was a little more sophisticated!

I’m a firm believer in telling my family I love them multiple times a day, but heart-shaped peppermint patties also are an excellent way to spread some Valentine’s Day cheer!

Inspiration and recipe found from here …however I modified it a little and took my own pics!

Here’s how I made them:

P.S.- You’ll also need a couple of unsweetened baking squares of chocolate.

Combine 3oz of cream cheese, 1/4 tsp of peppermint extract and 1/2 tsp of red food coloring until creamy.  Slowly add between 2 and 2 1/2 cups of confectioner’s sugar….I added it 1/2 cup at a time to prevent the powder from going everywhere!  Add the sugar until the consistency of the mixture is slightly crumbly.

Scoop out the crumbles and form them all into a ball…they will stick together once you start working it with your hands…..then flatten it into about 1/2 inch thick disk.  Use a cookie cutter to cut out your patties.

Place your patties (separated by parchment paper to prevent sticking) in an airtight container and stick them in the fridge for about 1/2 hour to firm up.  Jayna and I used this time to clean up a little!

Then, cover a cookie sheet with parchment paper.  I originally used cookie racks and foil-both of which FAILED (so disregard that aspect of the following pictures!).  Just use a cookie sheet (or other flat surface that will fit in your fridge) and parchment paper for easy removal.

Dump half a bag of semi-sweet chocolate chips and a couple of unsweetened chocolate baking squares into a deep, microwaveable container.  I used a big coffee mug.

Microwave the chocolate for about 30 seconds and stir to mix until all the chocolate is melted.  If it’s too thick….add a little vegetable oil.  It should drip off of a spoon pretty easily.

Here comes the messy part….

Use a spoon and tongs to completely cover each patty, gently tapping the tongs against the side of the mug to get any excess chocolate off of the patty.  Carefully place the patty onto the parchment papered cookie sheet.  Use a toothpick to spread chocolate over any exposed parts of the peppermint patty.  If you’d like, use a shaker and sprinkles to decorate your peppermint patties.

When your cookie sheet is filled, stick it in the fridge to help the chocolate solidify.  Then store your patties in an airtight container with parchment paper in between each layer.  Keep them in the fridge (although, if your house is like mine….they won’t last too long!!)

If you know of a better way to get the chocolate to coat them, PLEASE leave me a comment.  These were super easy to make, but I’ll admit the chocolate coating was messy and a bit annoying.  But then I tasted them, and it made it all worth the trouble!!!

Happy Valentine’s Day!!

Linkin’ up here this week!

Paper Mache NOEL

29 Dec

So you may have noticed the NOEL on my mantel.  I was feeling like my mantle needed a little something, and then I saw this on Pinterest.  Perfect!

Too bad I had  no time to actually follow those oh-so crafty directions.  But….I do have a crafty sister.  And I do have newspaper.  And flour.  Hmmm….paper mache anyone?  Here’s what Loo did:

First (I forgot to take a picture, sorry!) she mixed together approximately 1 cup of flour and 2 cups of water.  Tear your newspaper into one inch strips, about three inches long.

Dip each strip into the flour mixture and slide it over the side of the bowl to get off any excess liquid.  Wrap it tightly around each letter, overlapping each strip of paper a little bit.

Feel free to kind of paint the flour mixture over the finished letters, especially around the corners.

Someday, when we have some more time and inspiration (and hopefully before next Christmas!), we’ll end up putting some sort of color or texture on them.

Stay tuned for an updated picture once we finish it!

Christmas Yarn Ball Wreath

22 Dec

It’s been a hand-made Christmas this year for me….well, decoration-wise anyway.  With a new house comes a craving for new decor.  So, inspired by Pinterest and my fellow bloggers (and a little bit of Martha Stewart!), I set out to create.  One project was a new wreath for our porch door.  I made a burlap fall wreath, but obviously it was time to replace that.  I found this cute little number on Pinterest, and decided to try to replicate it.

Here’s how I did it:

I bought red and white yarn, and a spool of jute (twine), and a wreath form.  You’ll also need thick ribbon, scissors and hot glue.  I cut each page of the newspaper into quarters, and then crumpled them into balls.

I decided that the base of my wreath was going to be red, so I tied a knot around the wreath form at the seam and slowly wound the yarn around it, being careful not to overlap and to keep the yarn tight.

When I reached the end, I just tucked the yarn under….not very sturdy, but I’d be glueing on my ribbon holder on top, so it’s ok.

I secured one end of my ribbon where I had tucked the end of the yarn, using hot glue.  Do not secure the other end of the ribbon yet.

Then, with a second piece of ribbon, I formed a loop and hot glued it on top of the yarn and the already glued down part of the ribbon.

Then I took the first ribbon and wrapped it over the second loop and secured with hot glue.

Moving on to the yarn balls.  Just wrap them tightly around the newspaper balls.  You want the newspaper to be completely covered, and its ok that the balls are slightly different sizes.  I made about 22 of the red and white, and 8 of the twine.  Even though technically I am finished with my wreath, I still may go back and add some more balls to the sides and top to give it some more depth and bulk.  You can always add more, so I’d start with just 20 or so.  Find something good on TV because these take awhile!

Jayna decided she wanted to help wrap some balls too…..I’m thinking her fine motor skills aren’t quite there yet, what do you think?

But she was ok, she settled for naming her new baby “Yarnie” and toting it aroudn with Pink Baby.

Ready to glue on!

Start slowly, and layer as you go.  Remember that there is newspaper in the middle, so the balls can kind of be squished to fit where you need them.

Tada!  Great, bright addition to our living room!  And because I only used red, white and natural colors…I feel like I can leave it up through the winter…not so Christmas-y!

See on the left hand side where you can still see some of the red yarned wreath form?  That’s where I will probably end up adding a few more….you know, in my spare time!

I’m linking up here this week!

Pumpkins into Winter Decor!

9 Dec

We went a little overboard on the pumpkins and gourds this fall.  But I just couldn’t help myself!  All of the different colors and textures just really get me into the Fall spirit!  But, now Fall is over.  We ended up only carving two of the pumpkins, and now we have several that are still perfectly good….but just don’t fit in with our Winter decor…..Hmmmm….what to do?

Spray paint!

I bought red, green, white and gold spray paint at Lowes and went to town in the backyard!

After spraying a base coat onto all of the pumpkins, I used round stickers and painters tape to mark off sections of the pumpkin, and then sprayed a darker color over it.  It resulted in some polka-dot and “gift-wrapped” pumpkins!

Now I just need to find a giant gold bow to put on top!  I ended up putting the pumpkins back out on our front porch stairs, where there were for the Fall too.  A couple of the smaller ones now call the mantle home.

Remember my pumpkin entrance?

I loved it. Wished I could keep it all year.  But alas, this didn’t go with our Winter decor either.  But I didn’t want to just toss the perfectly good pumpkins.  Cue the spray paint!

I also sprayed the spanish moss white (it ended up still being a gray-ish color, but that was ok).  So I stacked ’em back up on my porch. Added a scarf.  Glued on some small black buttons for eyes and some large black buttons for…well, the buttons.  And cut a triangle nose out of orange sticky-backed foam. (Yes, I did try to hot glue an actual carrot onto his face, but the glue wouldn’t stick.)

Here’s how I made the hat.  My top pumpkin (which would be the head) had a long stem, so I wanted a hollow hat that I could fit right over the stem.  I used an old soup container and some more sticky-backed foam.

I wrapped the big piece of foam around the outside of the soup container and trimmed it to fit.  Then, I cut a circle to fit the top.

Since all I had left was two smaller pieces of foam, I cut two semi-circles slightly larger than the circumference of the soup container to be the brim.  If you had a big enough piece of foam, you could definitely just make it a circle.

Then, because my top pumpkin had a stem that I wanted the hat to balance on, I cut the middle out and then glued the two semi-circles together to form one circle with a hole in the middle.

Finally, I positioned the soup container over the hole so the brim was centered and hot glued the container to the foam.

Then I carefully positioned my hat on my pumpkin and viola!  Repurposed pumpkins into a snowman! I also have sticks for arms…but for now, can’t figure out how to attach them without puncturing my pumpkins….plus I think he looks just dandy without them!

It’s Fall, Y’all!

9 Nov

Its official!  Fall has finally arrived in the Lowcountry!  Running errands today was almost a pleasure as I admired the reds and oranges that popped up over the weekend around town.  Funny how the air smells fresher and the sky seems    blue-er against the bright-colored trees.  Maybe it’s just me….I love this time of year!

Were you wondering if I would ever show you any of my Fall creations from my birthday shopping trip?

I’ve been working on a few…

I decided I liked the little flowers on the wreath so much, that I made a couple of clips for the girls….Jayna modeled one while working on a button project with me…

We look quite festive from the street, don’t we?

See the three sheets of paper next to our front door?  We have been Boo’ed.  Three times to be exact!  Neighbors have been ringing our doorbell and running away, leaving buckets of Halloween and Fall goodies for us.  The catch?  Each time we are Boo’ed, we have to Boo two other neighbors.  Too bad all of this happened before Halloween….I’d like to do it again now and get rid of some of this candy!!

Speaking of Halloween…the girls did great!

We went out early, as a family (leaving a bowl of candy on the porch)…even Loo Loo dressed up as a ballerina!

Jayna was a little nervous to go up to the houses at first, but once she figured out that she got candy at each house….she got brave really fast!  Most of our neighbors were out on their porches, or driving around in their golf carts handing out candy.

After a couple of streets (and several  trips back to the house to get a flashlight, replace ballet slippers with sneakers, put more candy out), Buggy was ready to drop.  Literally.  First it was her candy bucket.  She just plopped it down in the middle of the sidewalk and kept walking to the next house!  Then, one street over, she followed the candy bucket down to the ground, and announced that she was “exhausted.”  Time to call it quits!

When we got home, Jayna was anxious to dump out her stash.  And in keeping with tradition, proceeded to sort all of her candy!

Sugar high!

Whew! October flew by….and believe it or not, our Fall Festivities are only just beginning!

Here’s where I’m linking up!

Halloween at Hundred Oaks

30 Oct

Last night was our Fifth Annual Halloween Party.  Now, if you don’t know much about me and Dave, know this.  We LOVE Halloween.  Well, really all things Fall.  I mean….my birthday, a cool relief from summer in the south, changing leaves, hayrides and bonfires, pumpkin patches, and HALLOWEEN.  What time of year could be better?!?!?

We love Halloween so much, that we have spent a small fortune on our parties….food, costumes and decor.  We’ll start with the costumes.  We spend so much time on decorating and cooking, that we usually kind of forget about our costumes until the last minute, and have to resort to buying your stereotypical couple costume.

Last year we attempted to get a little creative and piggy-back off of the Tiger and Elin scandal.

This year, we wanted to incorporate Loo into our costume….and we couldn’t afford all the face paint again! =)

And every year, we have a costume contest.  All the guests vote for the Funniest, Most Creative and Best Couple Costumes.  Winners get Halloween themed wine courtesy of World Market.  Here are some of our favorites through the years:

And our winners this year…

We always prepare enough food for a small army…and although people seem to eat the entire time, we always have a ton of food left over!  This year I added my zucchini muffins and some mummy and pumpkin cake pops.

Admittedly, we go a little overboard on decorations.  In fact, we get so into them, that we have to specifically put on our invites that children aren’t invited because our house is too scary!  We start on the friendly decor about a week before the party, and then send Jayna to Sue Sue and Papaw’s on the Saturday of our party and spend the entire day outfitting our home with bloody corpses,

Hollywood Horrors,

Ghosts, Gouls and Goblins.

We have a blast rearranging our dining room into a scientist’s lab, and last year, had a haunted maze in our garage that guests were required to walk through to get into the party.

But Hannibal is definately the scariest prop as far as I’m concerned….he is sooooo life-like.

And somehow he manages to pop up in different corners of the house every Halloween and scares the you-know-what out of me!  So Dave decided to capitalize on that this year, and put him in the bathroom!  Guests got a double dose of Hannibal as they saw a glimpse of him in the mirror as they walked into the bathroom, and then were forced to stare at him as they did their business!  What kind of sick-os live here anyway?!?!

But, I am exhausted as we have been planning our shin-dig for the past few weeks and were up late last night and up early this morning attempting to clean up before Buggy arrived home.  So, I’m off to bed for tonight….to dream about tomorrow!  Happy Halloween!

Tour of the Playroom

28 Oct

This is Jayna and Amelia’s playroom.  It was one of the first rooms to get “finished” (aka, unpacked) and it has been wonderful!  Jayna just loves that she has a room full of toys that she hasn’t seen in almost a year (thanks to storage!).  When holiday crazies are over, I plan to make some curtains….I’m thinking valances or roman shades…

As you can see, despite the fact that it has a huge walk-in closet to store and organize toys and crafts, this room just kind of “stays” messy.

But it’s ok!  Because the best thing about the playroom is….the doors can close and (once I get up some curtains), hide the mess!

Thanks for visiting!

Ballerina Big Sister

11 Oct

Buggy is officially a ballerina.  She started ballet at the YMCA in our neighborhood and loves it.  She loves a lot of things lately!  We walk to class every Monday, and join the other three ballerinas in butterfly stretches, sashays and tip toes.

They are learning a little dance for a performance of Bibbity Bobbity Boo on the last day of class.  Jayna loves to dance, but is quite often much more interested in comparing tutus, playing with her friends’ hair, swapping her shoes (she finds it fascinating that there is no right or left ballet shoe!  They can fit either foot!), and playing on the kickboxing equipment in the corner of the room.  Oh.  And don’t forget the mirrors.  She loves the mirrors!

But she also loves Ms. Lisa, her teacher (and also a friend from church).  And let me tell you-Ms. Lisa has the patience of a Saint with this crew of active girls!  But she manages to herd them each week and they all love ballet!

Jayna has proved to be an excellent Big Sister.  She loves “babysitting,” which consists of her playing with Amelia while I pee. =)  Amongst other things.  Really, it has been my saving grace, as I am able to do many 1-2 minute activities now that I have this new-found babysitter!

I am actually so fortunate to have had soooooo much help these past few weeks with moving and settling into the new house.  We have even had our first weekend visitors!  My aunts and uncle and cousins came to visit and meet Amelia a couple of weeks ago.  You may remember Julia and Wouter from our trip to Lancaster this summer.

It was their first time to Charleston, so we had to show them the sights.  And indulge in a little fountain playing!

And last week, Mom Mom flew down for a long weekend for her share of Baby Holding.

And she taught Buggy how to drive.

And managed to catch Elly and Tippy hanging out with Amelia!

So, that’s what we have been doing the past couple of weeks.  We are significantly downsizing the box situation, and our rooms are actually starting to look lived in!  It’s amazing how we can move into this big house, but have  somehow manage to have less storage than in our old house.  But I guess it’s really a good thing as we have been forced to declutter and prioritize our “stuff.” We pretty much have downstairs under control and are now concentrating on unpacking clothes and bedrooms.

Remember this masterpiece?Dave allowed me to buy it for the loft (aka “My Craft Room”), to do my crafts and sewing on.  It was beautiful.  Was.  It cost an arm and a leg to buy, store and deliver.  Turns out, there was a reason why it was so expensive.  Apparently it was actually a kitchen island, and was made of one piece of carved wood.  And was extremely large. As in, larger than our doorway…let alone our staircase!  So….we had to return it.  Now I have a store credit to my fav furniture store, but no craft table.  And subsequently, no craft room….as the loft has turned into the dumping ground for all things Wii and sorting place for the massive amount of laundry that has piled up wince we’ve moved in.  So the saga continues….

A Visit to the New House

19 Aug

Sorry I’m just getting around to sharing these pictures with y’all!  On the 12th….what was that, last Friday?…we went over to the new house to see the developments.  And we were pleasantly surprised to see siding going up, windows and doors, drywall in all the rooms and cabinets!  It really is starting to look like an actual house!


Dining Room

View from Dining Room into the Playroom….so excited for our French Doors!

the FROG

Guest Bath Upstairs

We’ll probably go again this weekend as the workers have been working on more siding on the front, the stone work and painting this week.  Stay tuned for even more improvements!