Archive | Tutorials RSS feed for this section

I was Featured! (and A Spring Wreath Tutorial)

5 Apr

Happy Tuesday!  I’m so excited to tell you that I was featured on My Favorite Finds this week (for sharing last week’s tutorial on my Upcycled Brown Paper Basket).  It was super easy to make….you should try it!

PhotobucketHere’s something else that is easy to make…

I was challenged about a month ago, by my mother, to make a spring wreath. And because I have nothing better to do, it kind of got pushed to the bottom of my To-Do list.  But then, I remembered that I would much rather craft, than wash windows.  So, it got pushed back up to the top!

I saw lots of cute spring wreaths on pinterest, and decided to keep it simple, with materials I already had.  After all, I didn’t want to blow my new budget already!!!

So, I decided to use some foam (from Lowes) duct-taped together to make my wreath form, and some left over packing paper from our move.  My goal was to use the paper to create some shabby-chic-ish southern inspired (Magnolias, perhaps?) flowers.

I crinkled up the paper and wrapped it around the wreath form to completely cover the grey color.

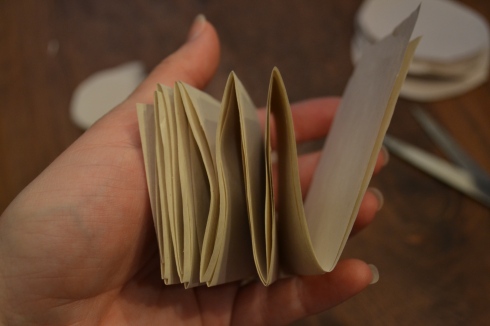
And then I cut the paper into strips.  I folded the strips accordion style width-wise, so I could cut more circles out at a time.  I cut three sizes of circles.

My circles were a little sloppy and uneven, but it didn’t matter at all in the end. And as I worked, I decided that my mom’s wreath needed a little color.  But I still liked the idea of a white base to the wreath.  So I decided to color just the edges of each of the circles purple (perfect for the Lenten Season!).

After coloring ALL of those circles, I started crinkling.  I actually got Jayna’s help…she crinkled and reopened my flowers, and then I glued the three layers together.  Then I topped it with a little crinkled scrap of paper in the middle to be the flower’s stigma.

I used a hot glue gun to glue each flower onto the wreath form, in close proximity to each other, so they kind of all scrunch together.

And I left a little gap at the top, so that when my mom hangs it, her wreath hanger won’t squish the flowers.  I put a little smiley on the back so it would be easy to find.

But then I decided that I needed a bow to make it look a little more complete (and elegant!).  I had a hard time finding ribbon that I liked, so I bought some thick, crocheted lace instead.  I made a bow and tacked it in place with hot glue.  Perfect….shabby chic!

Here’s where I’m linking up this week!

Easter Bunny Bowling

29 Mar

Well, aren’t I the crafty one lately!!  I told you I have been working on lots of things….  I think it must be my daily schedule.  I seem to be more on track lately and better able to manage my time (which gives me more ME TIME!). You know that we have put ourselves on a budget, but did you know we are also on a diet?  I’ll have to post more about that another time (just know we have lost almost 10 pounds each within the last month!!).  Because of these two factors, I have been searching for some creative, cheap Easter basket stuffers.  I didn’t want to fill the girls’ baskets with tons of candy and junk, and didn’t want to spend a ton on little Easter-themed junk either.  So what did I do?  I turned to Pinterest, of course!

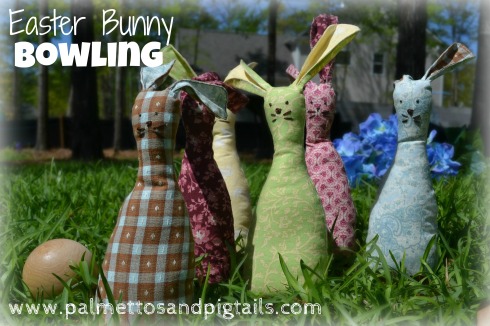
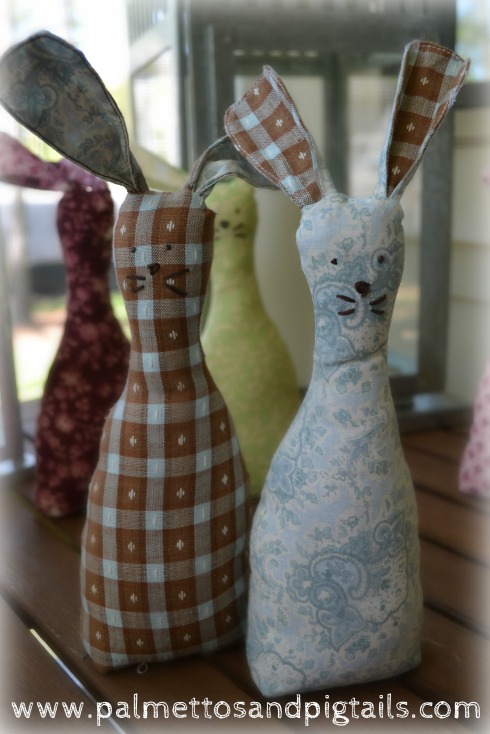
I found a free pattern for these cute little guys on etsy….free! courtesy of The Long Thread .  Hers were solid colors with patterned ear-insides.  But I had some beautiful spring scraps that I decided to use instead.

And I had the hardest time finding a hard wooden ball to serve as the bowling ball.  I finally found one at A.C. Moore….but it’s actually a doll head, and a little flat on one side.  So I plan on sanding it down a little more so it rolls better, and then painting it brown and modge podging something cute on….TBD.  I just have to find a naptime when both girls are down to break out the paint and glue!

I chose six fabrics, but made sure that they were grouped in pairs that matched, because I wanted the ears to coordinate with the bodies.

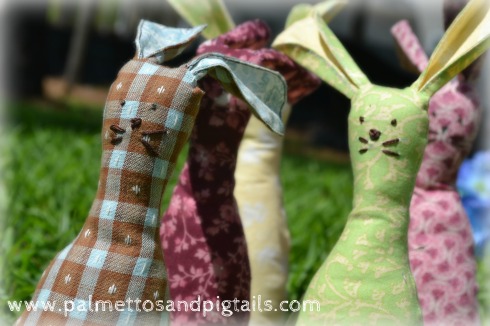
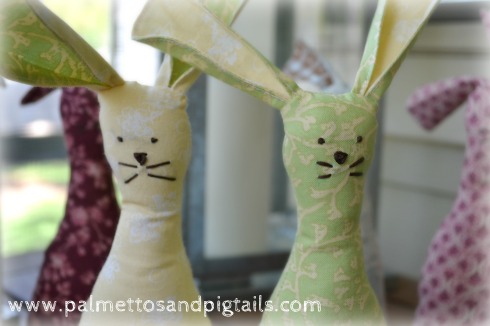
If you try this project, here are a couple of hints: Although I loved the darker, busier patterns (my reds!)….it’s much harder to see the embroidered faces because of this.  However, the lighter fabrics made the dark embroidery floss show through….so make sure to trim if you use lighter fabric.  I had planned to add a little something for a tail, but I forgot…so let me know if you try this and add one-I’d love to see your ideas!  Also, I did use a 1/2 cup of rice like the directions stated, but I filled the bunnies up with a little more stuffing than she prescribed….to about an inch from the bottom.  And finally, I don’t really like my ears.  I was worried about them being too short, so I was stingy on the seams….when actually the opposite happened and I think they are a little long (they have a hard time standing up!).  So feel free to extend their seam allowance a little (maybe to 1/2″)…and maybe your bunnies’ ears will be perkier!

Here’s the direct link to the pattern

I’m linkin’ up this week…and I have some new linky parties so be sure to check them out for other Spring inspiration!

Brown Paper Basket

26 Mar

In the midst of babies crying, toddlers whining, and dogs barking, I hear a beautiful sound…the doorbell.  Normally, I curse this sound because it makes my baby cry, wakes up my toddler, and makes my dog bark.  But that was already happening, so I welcomed the distraction.  But when I peered out the window, no one was there.  Now, this has happened to us before, when we got Boo’ed at Halloween….a candy version of Ding Dong Ditch.  But this time, when I opened the door instead of candy….BOXES!  Pampered Chef and Thirty One boxes to be exact!

So as exciting as opening all those boxes was (and no, it wasn’t all for me….I’ll have to redistribute to all the lovely ladies who bought all that stuff and allowed me to get all of my stuff for FREE!!), the packaging in these things was ridiculous!

And since I made a pledge to my good friend The Lorax, to speak for the trees, I thought maybe I’d find a way to upcycle some of this packaging.  A long time ago (before the days of pinterest unfortunately!), I had seen a cute use of recycling newspaper…..cutting into strips and weaving it into a basket!  Reminded me of Girl Scouting….

So, I decided to try it with some of the brown paper from my Pampered Chef boxes.  It was in pretty rough condition, but I found some good strips, and cut those into approximately one inch strips.  Then, I folded each of those strips in half and used white thread to sew down each side with 1/8″ seam allowance.  I figured that would make the brown paper look fabric-like when the basket was finished.

Basket weaving the bottom was the easy part.  Just make sure you are adding strips equally on all sides to keep you basket even.  I started with strips that were about 4 feet long, having no idea how big the basket would end up being.

About halfway through making the bottom, I realized that I only needed the strips to be about half that big (I wanted my basket to be about a foot squared, to hold my fabric scraps).  So I slid everything over and cut about two feet off the end of each of my strips.

When I decided that the bottom of my basket was big enough, I started on the sides.  I bent all the strips upwards, and then took a new strip and weaved it around the side (under, over, under, over….just like the bottom).  I used a little piece of tape to hold the end of the strip to make it easier to weave.  Let me tell you, it wasn’t pretty. 

I thought about quitting.  The strips were everywhere except for cooperating.  But I used tape liberally for those first couple of strips around the sides.  (I did take the tape off later, so just use it to tack).

But after about the third layer of weaving around the sides, everything kind of fell into place and starting looking like a basket!

With every layer I added, I was able to adjust the lower layers and make everything a little tighter and neater.  I was also able to take off the tape, as the other layers helped hold the ends in too.  I just tucked the ends into the weave.  When I decided the sides were high enough, I stopped adding strips around the sides, and just tucked the ends of the basket into the weave.  You can see some of the places where I did that in this picture.

It ended up being the perfect size to hold all of my fabric scraps!

What do you do with your old newspaper or paper bags?

A Little Bit of Love

14 Feb

Usually, Valentine’s Day isn’t so big of a deal in our house.  I’d like to think that we are pretty good at showing our love on a daily basis….so usually Dave and I just go out to dinner…maybe a glass of wine.  This year, though, thanks to Pinterest and a big sale at Michael’s, I had lots of inspiration!!

 Found this idea here…took a toilet paper roll and used it to stamp hearts on butcher paper to serve as wrapping paper.

Found this idea on pinterest, and did it myself….but her idea was a little more sophisticated!

I’m a firm believer in telling my family I love them multiple times a day, but heart-shaped peppermint patties also are an excellent way to spread some Valentine’s Day cheer!

Inspiration and recipe found from here …however I modified it a little and took my own pics!

Here’s how I made them:

P.S.- You’ll also need a couple of unsweetened baking squares of chocolate.

Combine 3oz of cream cheese, 1/4 tsp of peppermint extract and 1/2 tsp of red food coloring until creamy.  Slowly add between 2 and 2 1/2 cups of confectioner’s sugar….I added it 1/2 cup at a time to prevent the powder from going everywhere!  Add the sugar until the consistency of the mixture is slightly crumbly.

Scoop out the crumbles and form them all into a ball…they will stick together once you start working it with your hands…..then flatten it into about 1/2 inch thick disk.  Use a cookie cutter to cut out your patties.

Place your patties (separated by parchment paper to prevent sticking) in an airtight container and stick them in the fridge for about 1/2 hour to firm up.  Jayna and I used this time to clean up a little!

Then, cover a cookie sheet with parchment paper.  I originally used cookie racks and foil-both of which FAILED (so disregard that aspect of the following pictures!).  Just use a cookie sheet (or other flat surface that will fit in your fridge) and parchment paper for easy removal.

Dump half a bag of semi-sweet chocolate chips and a couple of unsweetened chocolate baking squares into a deep, microwaveable container.  I used a big coffee mug.

Microwave the chocolate for about 30 seconds and stir to mix until all the chocolate is melted.  If it’s too thick….add a little vegetable oil.  It should drip off of a spoon pretty easily.

Here comes the messy part….

Use a spoon and tongs to completely cover each patty, gently tapping the tongs against the side of the mug to get any excess chocolate off of the patty.  Carefully place the patty onto the parchment papered cookie sheet.  Use a toothpick to spread chocolate over any exposed parts of the peppermint patty.  If you’d like, use a shaker and sprinkles to decorate your peppermint patties.

When your cookie sheet is filled, stick it in the fridge to help the chocolate solidify.  Then store your patties in an airtight container with parchment paper in between each layer.  Keep them in the fridge (although, if your house is like mine….they won’t last too long!!)

If you know of a better way to get the chocolate to coat them, PLEASE leave me a comment.  These were super easy to make, but I’ll admit the chocolate coating was messy and a bit annoying.  But then I tasted them, and it made it all worth the trouble!!!

Happy Valentine’s Day!!

Linkin’ up here this week!

Scrap Quilt

25 Jan

I’ve been sewing for about a year now, and have no real craft area.  Everything is kept in Tupperware tubs in a giant armoire.  So, needless to say, I was overflowing with little scraps of fabric.  Time to do something with those little pieces.  Because they were kind of all in one color family (pinks, browns, turquoise and green), but all different sizes, I decided to try my hand at a scrap quilt.

Don’t get me wrong….I can appreciate the design and hard work that quilters put into their creations.  But I have no desire to become a quilter.  In fact, I can barely call myself a sewer……so I needed to be able to do this simply and quickly.

So I cut up my fabric into different size pieces, using several pieces of cardboard as my templates to trace.  I had a quilt panel in my pile of random fabrics, but like I said….I have no intention of quilting.  So I cut it up instead, cutting the characters from the quilt panel into the largest squares, and then using the surrounding patterns as smaller parts.  I used strips of the fabrics as the borders too.  And to be honest, I did this completely by trial and error….I had no idea what I was doing.  But, I figured it was a scrap quilt, so the more hodgepodged it looked, the better.

Bear with me…..here’s how I did it:

Materials:
thirty 6 1/2 inch squares
sixty 3 1/2 inch squares
seven strips of 45 1/2 inches worth of fabric…..with each strip being 2 inches wide….and having 1/4 inch of seam allowance on each end
one large piece of fabric 47 inches by 45 1/2 inches
1 piece of quilt batting measuring 46 1/2 inches by 45 inches

I had a big scrap of padding….so I folded a corner over to form a square and cut off the excess ( I think it ended up being about 46 square inches)
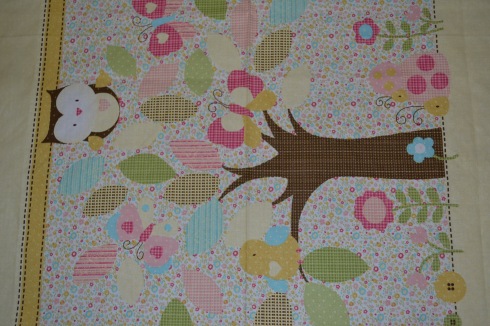
This was one of the spare pieces of fabric I had that I loved, but wasn’t sure what to do with….so I cut it up to use as my focus squares on my quilt.

I measured all of the little critters on the panel, and luckily they all were about 6″….so I decided to make my larger squares that size (when finished).

I used a piece of cardboard as my template to cut around.  (I made three templates…a 6 1/2″ square, a 3 1/2″ square and a 2″ wide strip….length doesn’t really matter…..all seam allowances for this project are 1/4″)

 There were large chunks of interesting patterns left after I cut out the critters, so I supplemented more 6 1/2″ squares with them (and other fabric I had), and also used them for my smaller squares (which ended up being 3 1/2″ squares).  If you look carefully, you can see where I drew my lines using a washable fabric pen.  All of my seam allowances were 1/4″.

I also cut 2″ strips from scraps (varying lengths) to use as my borders.  Then I laid everything out on top of my batting.  I wasn’t too concerned about it fitting exactly, but I wanted to make sure that it was at least as wide as the batting….I ended up trimming excess at the end of my project.  I also cut out one large piece of fabric to be the back of the quilt…..measure it to be the same size as your batting, and then add a 1/2″ around the edges to account for the seam.
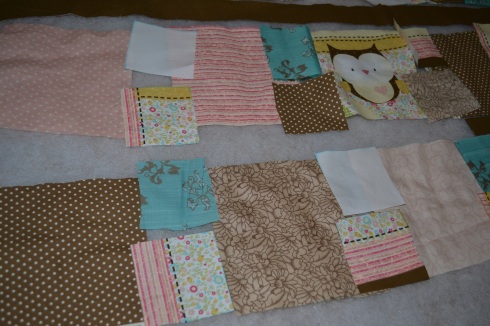
Lay out your whole quilt…..I alternated one 6 1/2″ square and then two 3 1/2″ squares across, and then a 2″ strip in between each of the square rows.  Just keep cutting scraps until your quilt is filled!  I arranged mine on top of my batting to make sure it was big enough, and so I could get a visual on where all of the pieces were going to go.

 I wanted to make sure that each of my fabrics were spaced out, and no two same patterns were touching.  I also had to watch the spacing of my green and turquoise pieces because they totally clashed together….but spread out against the other patterns looked nice and were great bursts of color!

Time to sew!
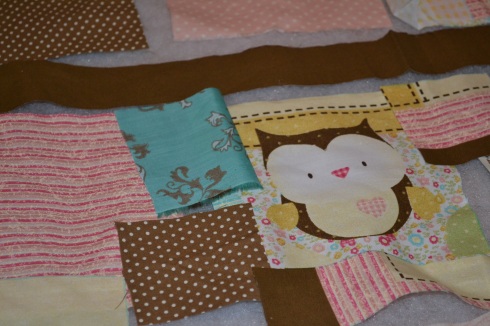
Since there were going to be two 3 1/2″ pieces in between every 6 1/2″ piece….I needed to sew those together first.

I started to pin everything together before sewing….and quickly gave up.  So much easier just to hold it in place as I sewed!

Take your two 3 1/2″ pieces and place them right sides touching, raw sides together.  Make sure you know which edge to sew (based on the two 6 1/2″ squares it will be touching….pay attention to color and pattern placement).
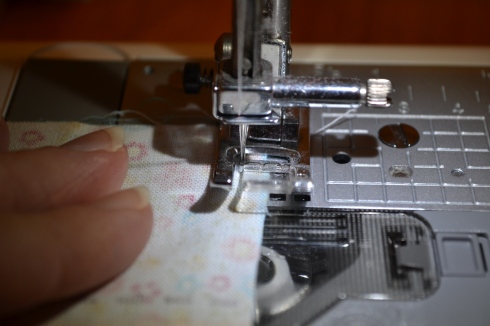
Sew the two pieces together with a 1/4″ seam…do a quick backstitch at the beginning and end to tack the ends.
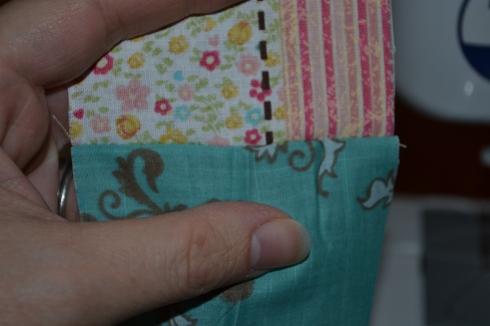
Here’s what the seam should look like on the right side.  Sew all of your pairs of 3 1/2″ squares together…but keep them placed out on your quilt so you know which direction they should go (again, watch your colors and patterns!).

Line up the raw edges of the 6 1/2″ square and the two (sewn together) 3 1/2″ squares….right sides touching.
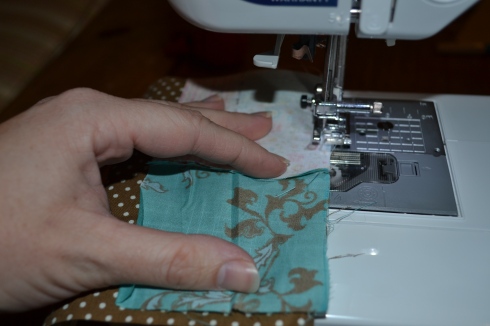
Sew 1/4″ seams, and backstitch.
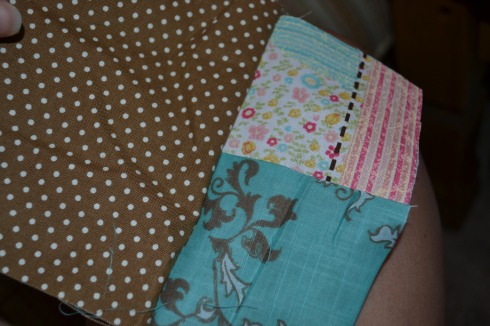
Here’s what it should look like.

Sew on the next pair of 3 1/2″ squares to the other side of your 6 1/2″ square and continue to the end of the row.

Here’s the first row I completed….you can see I didn’t follow my own advice about really watching my placement and which sides I was supposed to be stitching together….my snail was sideways!  I had to undo the stitching on both sides of that square, turn it, and redo it!

Do the same with your 2″ border strips.  Sew them all together-end to end with 1/4″ seams.  Then place them right sides together with your square strips, raw edges touching.  Sew a straight line down the whole strip (1/4″ seam), and backstitch at beginning and end. Once you do this to all of your strips, your quilt will be all in one piece….very satisfying to see it all come together!
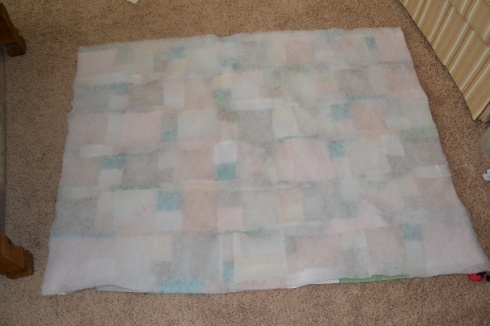
I pinned the right sides of my quilt and the fabric for the back together.  I layered the batting on top of the quilt back and pinned it.

Ok, so I forgot to take pictures of these next couple of steps (sorry!), but they were pretty easy:

-I sewed all the way around (1/4″ seam), making sure to get the batting into the seam as well.  I left a 6-8 inch opening on one end so I could turn everything right-side out.

-Carefully stuff everything through the hole so that your quilt is facing right-side out.  At the hole, fold the raw edges under (and pin if necessary) and sew closed.  I use an 1/8″ seam allowance to sew it closed…..and then I keep going all the way around the edge of the finished quilt.  Then, I sew another stitch at a 1/4″ in from the edge….all the way around to give it a nice finished look.

Then I sewed along the right hand side of each of the strips of fabric in order to keep the batting in place.  I spread out the seam and used a light pink thread since it matched much of my fabric color and was light enough to be seen on the back of the quilt (my fabric was a yellow and white gingham on the back)

Done!
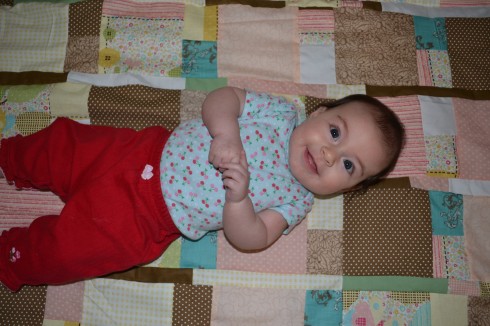
And she loves it!
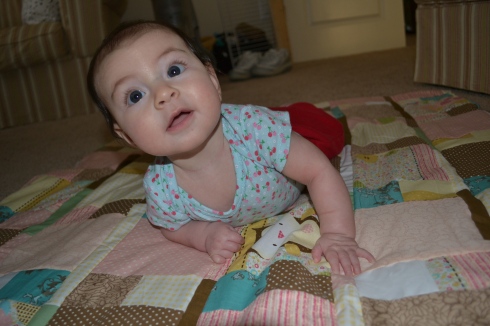
Room for two!

P.S. Here’s where I’m linking up!

Paper Mache NOEL

29 Dec

So you may have noticed the NOEL on my mantel.  I was feeling like my mantle needed a little something, and then I saw this on Pinterest.  Perfect!

Too bad I had  no time to actually follow those oh-so crafty directions.  But….I do have a crafty sister.  And I do have newspaper.  And flour.  Hmmm….paper mache anyone?  Here’s what Loo did:

First (I forgot to take a picture, sorry!) she mixed together approximately 1 cup of flour and 2 cups of water.  Tear your newspaper into one inch strips, about three inches long.

Dip each strip into the flour mixture and slide it over the side of the bowl to get off any excess liquid.  Wrap it tightly around each letter, overlapping each strip of paper a little bit.

Feel free to kind of paint the flour mixture over the finished letters, especially around the corners.

Someday, when we have some more time and inspiration (and hopefully before next Christmas!), we’ll end up putting some sort of color or texture on them.

Stay tuned for an updated picture once we finish it!

Christmas Yarn Ball Wreath

22 Dec

It’s been a hand-made Christmas this year for me….well, decoration-wise anyway.  With a new house comes a craving for new decor.  So, inspired by Pinterest and my fellow bloggers (and a little bit of Martha Stewart!), I set out to create.  One project was a new wreath for our porch door.  I made a burlap fall wreath, but obviously it was time to replace that.  I found this cute little number on Pinterest, and decided to try to replicate it.

Here’s how I did it:

I bought red and white yarn, and a spool of jute (twine), and a wreath form.  You’ll also need thick ribbon, scissors and hot glue.  I cut each page of the newspaper into quarters, and then crumpled them into balls.

I decided that the base of my wreath was going to be red, so I tied a knot around the wreath form at the seam and slowly wound the yarn around it, being careful not to overlap and to keep the yarn tight.

When I reached the end, I just tucked the yarn under….not very sturdy, but I’d be glueing on my ribbon holder on top, so it’s ok.

I secured one end of my ribbon where I had tucked the end of the yarn, using hot glue.  Do not secure the other end of the ribbon yet.

Then, with a second piece of ribbon, I formed a loop and hot glued it on top of the yarn and the already glued down part of the ribbon.

Then I took the first ribbon and wrapped it over the second loop and secured with hot glue.

Moving on to the yarn balls.  Just wrap them tightly around the newspaper balls.  You want the newspaper to be completely covered, and its ok that the balls are slightly different sizes.  I made about 22 of the red and white, and 8 of the twine.  Even though technically I am finished with my wreath, I still may go back and add some more balls to the sides and top to give it some more depth and bulk.  You can always add more, so I’d start with just 20 or so.  Find something good on TV because these take awhile!

Jayna decided she wanted to help wrap some balls too…..I’m thinking her fine motor skills aren’t quite there yet, what do you think?

But she was ok, she settled for naming her new baby “Yarnie” and toting it aroudn with Pink Baby.

Ready to glue on!

Start slowly, and layer as you go.  Remember that there is newspaper in the middle, so the balls can kind of be squished to fit where you need them.

Tada!  Great, bright addition to our living room!  And because I only used red, white and natural colors…I feel like I can leave it up through the winter…not so Christmas-y!

See on the left hand side where you can still see some of the red yarned wreath form?  That’s where I will probably end up adding a few more….you know, in my spare time!

I’m linking up here this week!

Pumpkins into Winter Decor!

9 Dec

We went a little overboard on the pumpkins and gourds this fall.  But I just couldn’t help myself!  All of the different colors and textures just really get me into the Fall spirit!  But, now Fall is over.  We ended up only carving two of the pumpkins, and now we have several that are still perfectly good….but just don’t fit in with our Winter decor…..Hmmmm….what to do?

Spray paint!

I bought red, green, white and gold spray paint at Lowes and went to town in the backyard!

After spraying a base coat onto all of the pumpkins, I used round stickers and painters tape to mark off sections of the pumpkin, and then sprayed a darker color over it.  It resulted in some polka-dot and “gift-wrapped” pumpkins!

Now I just need to find a giant gold bow to put on top!  I ended up putting the pumpkins back out on our front porch stairs, where there were for the Fall too.  A couple of the smaller ones now call the mantle home.

Remember my pumpkin entrance?

I loved it. Wished I could keep it all year.  But alas, this didn’t go with our Winter decor either.  But I didn’t want to just toss the perfectly good pumpkins.  Cue the spray paint!

I also sprayed the spanish moss white (it ended up still being a gray-ish color, but that was ok).  So I stacked ’em back up on my porch. Added a scarf.  Glued on some small black buttons for eyes and some large black buttons for…well, the buttons.  And cut a triangle nose out of orange sticky-backed foam. (Yes, I did try to hot glue an actual carrot onto his face, but the glue wouldn’t stick.)

Here’s how I made the hat.  My top pumpkin (which would be the head) had a long stem, so I wanted a hollow hat that I could fit right over the stem.  I used an old soup container and some more sticky-backed foam.

I wrapped the big piece of foam around the outside of the soup container and trimmed it to fit.  Then, I cut a circle to fit the top.

Since all I had left was two smaller pieces of foam, I cut two semi-circles slightly larger than the circumference of the soup container to be the brim.  If you had a big enough piece of foam, you could definitely just make it a circle.

Then, because my top pumpkin had a stem that I wanted the hat to balance on, I cut the middle out and then glued the two semi-circles together to form one circle with a hole in the middle.

Finally, I positioned the soup container over the hole so the brim was centered and hot glued the container to the foam.

Then I carefully positioned my hat on my pumpkin and viola!  Repurposed pumpkins into a snowman! I also have sticks for arms…but for now, can’t figure out how to attach them without puncturing my pumpkins….plus I think he looks just dandy without them!

Turkey Tee-Shirt Tutorial

24 Nov

Thanks to The Cottage Home’s Tutorial, I made a little Turkey-Tee for both of my little turkeys!  Thanksgiving is obviously always a big deal, but this year, it’s extra-special because it falls on the Thursday after Amelia’s baptism, so we have LOTS of family and friends staying in town for the holiday weekend.  Also, with it being our first of many Thanksgivings in our new house, I’ve been thinking of traditions to start…got any ideas?  What does your family do on Thanksgiving Day?  In our house, the men always fry a turkey (or, two, this year!) and watch football, while the ladies cook up some yummy side dishes and catch-up.  And the Macy’s Day parade is almost always on in the background!

Back to the tutorial…..unfortunately, I wasn’t able to open Cottage Mama’s template, so I did mine from scratch, based on hers.  So bear with me!  Included on my template is also the leaf templates from this tutorial.

For the tee-shirts, you will need:

6 different patterns of scrap fabric…ideally in the same color scheme
1 shirt in the size of your little turkey (I actually went a size up so Buggy can wear hers next year too!)
Iron-On Adhesive (that’s the kind that sticks on both sides!)
Sewing Machine
Iron
A couple of hours while your kids nap


Directions:

1.  Iron on the adhesive to the fabric squares, leaving the paper backing on.

2.  Print out the turkey template, cut out the pieces and trace them onto the paper side of the adhesive.  You will need two feathers from each pattern (except for the middle feather…you just need one of those).

3. Cut out all of your pieces, which will have fabric on one side, and the adhesive backing on the other (with the paper still on).

4. Iron on each feather, starting with the middle one.


5. Carefully stitch around each feather and the body, leaving a little edge for natural fraying whenever you wash your shirt.

6. Using embroidery floss, sew a “V” on your bird’s face, for a beak,  and one long stitch and three short stitches for the feet.  Make sure all of knots are on the inside of the shirt.

These are my knots on the inside of the shirt for his legs.

7. Cut about a half an inch of red rick-rack for the turkey’s gobbler/hully gully/whatever you want to call it.  I singed the ends off with a lighter to prevent fraying.  Then I used red thread and my sewing machine to carefully sew it down.

8. Finally, I turned them inside out and ran them through the washing machine.  Then I attempted to get all three girls to pose in them….but have you ever tried to get three toddlers awake, in a good mood, and dressed….all at the same time?  Impossible.  So, next best thing….

Happy Thanksgiving!

Here’s where I am linking up this week!

Albuquerque was a Turkey

17 Nov

I’m not sure what the rest of the words to this song are….all I know is that Jayna is singing it in her Thanksgiving Program at school next week, it is sung to the tune of “Clementine,” and Jayna only knows one line of the song.  And that one line is subsequently in my head ALL of the time!

So, in honor of Mr. Albuquerque the Turkey, I made some cake pops in the shape of turkeys for our Sunday School Thanksgiving Dinner….also known as our Meat and Skeet.  We all bring our favorite Thanksgiving Day sides and desserts and gather at our friends Lisa and Jordan’s house to fry up some turkeys, shoot some skeet and visit.  It’s always a good time, and a great way to kick off the holiday season.

While we were there, Jayna used the rest room and then promptly told me that “Ms. Lisa’s toilet paper is sooooooo soft!”  When she told Ms. Lisa how much she loved her toilet paper, Ms. Lisa let her take home a roll!

And now for my turkeys.  At first, I was skeptical, but after they were finished, I decided they really were quite cute!

I started to draw eyes and little pointy beaks on them….but then decided that the beaks looked like smiley faces and they looked kind of dumb.  So half of them had faces and half did not.  They all got gobblers though! (Made out of little colored chocolate pieces I found at Party City).

The heads were made from the all chocolate M&M’s….they are slightly bigger than regular M&M’s and the whole pack is brown!  No more digging through the colored bags!  The heads were held on with a dab of melted chocolate.

Tail feathers were made from “Indian Candy Corn” and held on by a dab of melted chocolate.  Feet were the ends of pretzel sticks stuck into the melted chocolate as soon as I dipped the balls in chocolate.

They were a little more involved to make, but a terrific hit at the party….they were gone so fast that I didn’t even have a chance to photograph them on the table!!

Here’s where I’m linking up this week!