Tag Archives: Upcycling

I was Featured! (and A Spring Wreath Tutorial)

5 Apr

Happy Tuesday!  I’m so excited to tell you that I was featured on My Favorite Finds this week (for sharing last week’s tutorial on my Upcycled Brown Paper Basket).  It was super easy to make….you should try it!

PhotobucketHere’s something else that is easy to make…

I was challenged about a month ago, by my mother, to make a spring wreath. And because I have nothing better to do, it kind of got pushed to the bottom of my To-Do list.  But then, I remembered that I would much rather craft, than wash windows.  So, it got pushed back up to the top!

I saw lots of cute spring wreaths on pinterest, and decided to keep it simple, with materials I already had.  After all, I didn’t want to blow my new budget already!!!

So, I decided to use some foam (from Lowes) duct-taped together to make my wreath form, and some left over packing paper from our move.  My goal was to use the paper to create some shabby-chic-ish southern inspired (Magnolias, perhaps?) flowers.

I crinkled up the paper and wrapped it around the wreath form to completely cover the grey color.

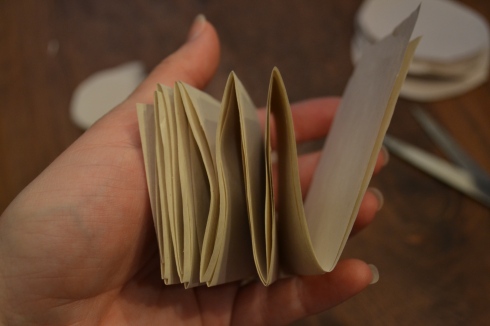
And then I cut the paper into strips.  I folded the strips accordion style width-wise, so I could cut more circles out at a time.  I cut three sizes of circles.

My circles were a little sloppy and uneven, but it didn’t matter at all in the end. And as I worked, I decided that my mom’s wreath needed a little color.  But I still liked the idea of a white base to the wreath.  So I decided to color just the edges of each of the circles purple (perfect for the Lenten Season!).

After coloring ALL of those circles, I started crinkling.  I actually got Jayna’s help…she crinkled and reopened my flowers, and then I glued the three layers together.  Then I topped it with a little crinkled scrap of paper in the middle to be the flower’s stigma.

I used a hot glue gun to glue each flower onto the wreath form, in close proximity to each other, so they kind of all scrunch together.

And I left a little gap at the top, so that when my mom hangs it, her wreath hanger won’t squish the flowers.  I put a little smiley on the back so it would be easy to find.

But then I decided that I needed a bow to make it look a little more complete (and elegant!).  I had a hard time finding ribbon that I liked, so I bought some thick, crocheted lace instead.  I made a bow and tacked it in place with hot glue.  Perfect….shabby chic!

Here’s where I’m linking up this week!

Brown Paper Basket

26 Mar

In the midst of babies crying, toddlers whining, and dogs barking, I hear a beautiful sound…the doorbell.  Normally, I curse this sound because it makes my baby cry, wakes up my toddler, and makes my dog bark.  But that was already happening, so I welcomed the distraction.  But when I peered out the window, no one was there.  Now, this has happened to us before, when we got Boo’ed at Halloween….a candy version of Ding Dong Ditch.  But this time, when I opened the door instead of candy….BOXES!  Pampered Chef and Thirty One boxes to be exact!

So as exciting as opening all those boxes was (and no, it wasn’t all for me….I’ll have to redistribute to all the lovely ladies who bought all that stuff and allowed me to get all of my stuff for FREE!!), the packaging in these things was ridiculous!

And since I made a pledge to my good friend The Lorax, to speak for the trees, I thought maybe I’d find a way to upcycle some of this packaging.  A long time ago (before the days of pinterest unfortunately!), I had seen a cute use of recycling newspaper…..cutting into strips and weaving it into a basket!  Reminded me of Girl Scouting….

So, I decided to try it with some of the brown paper from my Pampered Chef boxes.  It was in pretty rough condition, but I found some good strips, and cut those into approximately one inch strips.  Then, I folded each of those strips in half and used white thread to sew down each side with 1/8″ seam allowance.  I figured that would make the brown paper look fabric-like when the basket was finished.

Basket weaving the bottom was the easy part.  Just make sure you are adding strips equally on all sides to keep you basket even.  I started with strips that were about 4 feet long, having no idea how big the basket would end up being.

About halfway through making the bottom, I realized that I only needed the strips to be about half that big (I wanted my basket to be about a foot squared, to hold my fabric scraps).  So I slid everything over and cut about two feet off the end of each of my strips.

When I decided that the bottom of my basket was big enough, I started on the sides.  I bent all the strips upwards, and then took a new strip and weaved it around the side (under, over, under, over….just like the bottom).  I used a little piece of tape to hold the end of the strip to make it easier to weave.  Let me tell you, it wasn’t pretty. 

I thought about quitting.  The strips were everywhere except for cooperating.  But I used tape liberally for those first couple of strips around the sides.  (I did take the tape off later, so just use it to tack).

But after about the third layer of weaving around the sides, everything kind of fell into place and starting looking like a basket!

With every layer I added, I was able to adjust the lower layers and make everything a little tighter and neater.  I was also able to take off the tape, as the other layers helped hold the ends in too.  I just tucked the ends into the weave.  When I decided the sides were high enough, I stopped adding strips around the sides, and just tucked the ends of the basket into the weave.  You can see some of the places where I did that in this picture.

It ended up being the perfect size to hold all of my fabric scraps!

What do you do with your old newspaper or paper bags?